Self-hosting productivity suites, developer platforms, and automation tools—such as Nextcloud, Home Assistant, Gitea, or private Ollama APIs—gives you absolute ownership over your workloads and telemetry. Yet, the moment you need external access outside your local area network (LAN), traditional networking models force you into severe compromises. Historically, exposing a home server or private VPC required port forwarding (ports 80 and 443) on your boundary router, managing Dynamic DNS (DDNS) daemons, and exposing your residential or corporate public IP address to constant automated port scans, brute-force attacks, and distributed denial-of-service (DDoS) botnets.
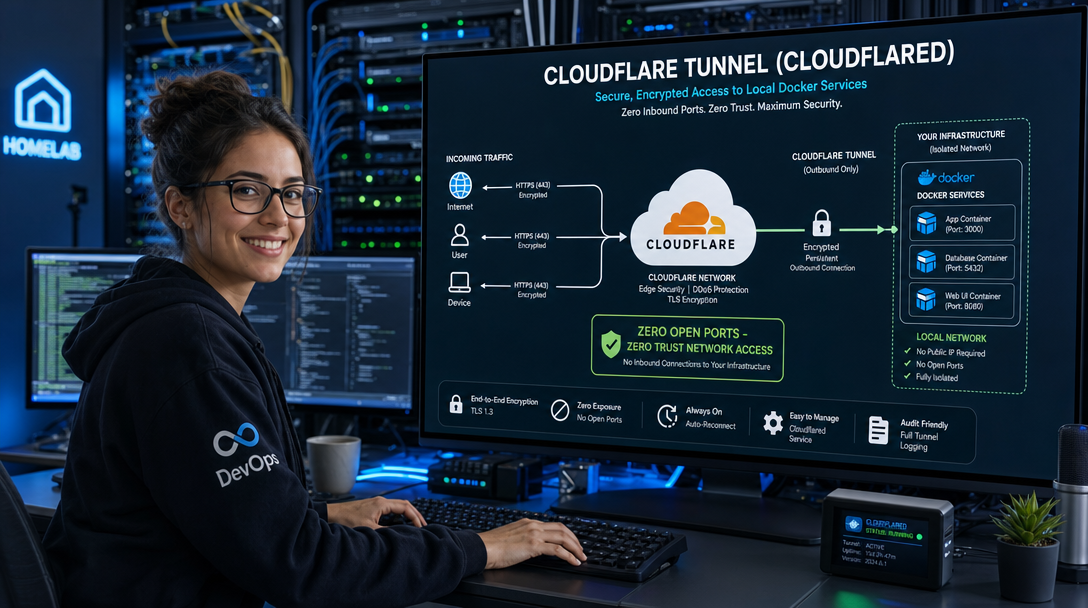
Cloudflare Tunnels (powered by the lightweight, open-source cloudflared daemon) completely revolutionizes this paradigm. Instead of opening ingress firewall holes, cloudflared establishes outbound-only, encrypted HTTP/2 or QUIC connections directly to Cloudflare’s global edge Anycast network. In this in-depth guide, we will configure a declarative, containerized Cloudflare Tunnel within Docker Compose. We will examine the underlying network architecture, deploy real-world backend services with zero open ports, enforce granular Zero Trust access policies, and establish rigorous production hardening.
Why Traditional Port Forwarding Fails in Modern Homelabs
To appreciate the architectural shift introduced by Cloudflare Tunnels, consider the operational vulnerabilities of traditional inbound NAT/port forwarding:
- Direct Public IP Exposure: Port forwarding binds your domain directly to your host’s WAN IP. Any attacker or script kiddie querying your DNS record immediately discovers your residential network’s geographical location and ISP.
- Carrier-Grade NAT (CGNAT) Incompatibility: Many fiber, 5G, and modern broadband ISPs do not issue routable public IPv4 addresses. Instead, they place subscribers behind CGNAT (RFC 6598,
100.64.0.0/10), rendering traditional inbound port forwarding completely impossible without complex external VPS relays. - Attack Surface Expansion: If your web server or reverse proxy suffers from an unpatched zero-day vulnerability (or misconfigured TLS ciphers), an internet-wide mass scanner can compromise your host directly.
- Dynamic IP Drift: Residential connections rotate IP leases unpredictably. If your DDNS updater stalls, SSL renewal fails and all remote access breaks.
Cloudflare Tunnels eliminates every single one of these problems. Inbound traffic terminates on Cloudflare’s distributed edge, where enterprise DDoS mitigation, Web Application Firewall (WAF) inspections, and automated SSL/TLS termination occur before a single packet reaches your server.
Architecture & Packet Flow Overview
When you run cloudflared as a Docker container, it sits on an internal, user-defined Docker bridge network alongside your application containers. The daemon initiates four persistent outbound tunnels across multiple Cloudflare datacenters over port 7844 (UDP/QUIC) or port 443 (TCP/HTTP2). No router port is ever opened.
+-------------------------------------------------------------------------------+
|                                  INTERNET                                     |
|  [Remote Client] ---- HTTPS (TCP 443) ----> [Cloudflare Global Anycast Edge]  |
|                                                     |                         |
|                                          WAF / DDoS / Zero Trust Access       |
|                                                     |                         |
+-----------------------------------------------------+-------------------------+
                                                      |
                                     Outbound Tunnel Only (QUIC / Port 7844)
                                     [NO INBOUND PORTS OPEN ON ROUTER]
                                                      |
+-----------------------------------------------------v-------------------------+
| HOMELAB / DOCKER HOST (Private Network / CGNAT)                              |
|                                                                               |
|   +-----------------------------------------------------------------------+   |
|   | Docker Internal Network (tunnel_net - 172.28.0.0/16)                  |   |
|   |                                                                       |   |
|   |   +-------------------+              +----------------------------+   |   |
|   |   |   cloudflared     |--- HTTP ---->| App 1: Nextcloud (app:80)  |   |   |
|   |   |   (Daemon)        |              +----------------------------+   |   |
|   |   |                   |--- HTTP ---->| App 2: Uptime Kuma (kuma)  |   |   |
|   |   |                   |              +----------------------------+   |   |
|   |   |                   |--- HTTP ---->| App 3: Ollama WebUI (8080) |   |   |
|   |   +-------------------+              +----------------------------+   |   |
|   +-----------------------------------------------------------------------+   |
+-------------------------------------------------------------------------------+
When an external user requests https://vault.yourdomain.com, Cloudflare verifies SSL, processes security policies, and proxies the payload through the active QUIC tunnel. Inside your Docker engine, cloudflared receives the decrypted request and forwards it across the private Docker network to the target container using Docker’s embedded DNS resolution (e.g., http://vaultwarden:80). The application container never needs to expose host ports (e.g., no ports: - "8080:80").
Prerequisites
- A Linux host running Ubuntu 24.04 LTS, Debian 12, or similar server distribution with Docker Engine (v26+) and Docker Compose (v2.24+) installed.
- A registered domain name delegated to Cloudflare DNS (nameservers pointing to Cloudflare).
- A Cloudflare Zero Trust account (free tier covers up to 50 users).
- A non-root user with
sudopermissions and Docker group membership.
Step 1: Create the Cloudflare Tunnel via Zero Trust Dashboard
While tunnels can be created via command-line credentials, Cloudflare’s dashboard-managed remotely configured tunnels (Zero Trust Dashboard) offer seamless ingress routing, automated DNS record provisioning, and centralized policy enforcement without editing local text files whenever you add a new service.
- Log in to the Cloudflare One (Zero Trust) Dashboard.
- Navigate to Networks > Tunnels in the left sidebar.
- Click Add a tunnel and select Cloudflare Managed.
- Enter a descriptive name for your tunnel (e.g.,
homelab-production-docker) and click Save tunnel. - Under Choose your environment, select Docker.
- Cloudflare will display a pre-populated command containing your unique tunnel token:
Copy the long Base64 string that followsdocker run cloudflare/cloudflared:latest tunnel --no-autoupdate run --token eyJh...--token. This is yourTUNNEL_TOKEN.
Step 2: Prepare the Directory Structure and Environment Variables
Always isolate credentials from your version-controlled Compose definitions. Create a dedicated project directory on your server:
mkdir -p ~/docker-stacks/cloudflare-tunnel
cd ~/docker-stacks/cloudflare-tunnel
Create a secure .env file with restrictive file permissions (chmod 600) to store your tunnel token:
cat << 'EOF' > .env
# Cloudflare Tunnel Configuration
TUNNEL_TOKEN=eyJhYmNkZWZnaGlqa2xtbm9wcXJzdHV2d3h5ejEyMzQ1Njc4OTA...
CLOUDFLARED_VERSION=latest

# Service Configurations
TIMEZONE=UTC
EOF

chmod 600 .env
Step 3: Build the Declarative Docker Compose Stack
Now, let’s assemble our production docker-compose.yml file. We will deploy the cloudflared daemon alongside two representative self-hosted workloads: Uptime Kuma (a monitoring dashboard) and Whoami (a tiny HTTP benchmarking and header debugging container). Crucially, notice that neither service exposes any port bindings on the host operating system.
services:
  # =========================================================================
  # Cloudflare Tunnel Daemon (cloudflared)
  # =========================================================================
  cloudflared:
    image: cloudflare/cloudflared:${CLOUDFLARED_VERSION:-latest}
    container_name: cloudflared_tunnel
    restart: unless-stopped
    command: tunnel --no-autoupdate run
    environment:
      - TUNNEL_TOKEN=${TUNNEL_TOKEN}
      - TUNNEL_METRICS=0.0.0.0:2000
      - TUNNEL_TRANSPORT_PROTOCOL=quic
    networks:
      - tunnel_mesh
    security_opt:
      - no-new-privileges:true
    read_only: true
    tmpfs:
      - /tmp
    healthcheck:
      test: ["CMD", "cloudflared", "version"]
      interval: 30s
      timeout: 5s
      retries: 3
      start_period: 10s

  # =========================================================================
  # Demo Service 1: Uptime Kuma (Monitoring Dashboard)
  # =========================================================================
  uptime-kuma:
    image: louislam/uptime-kuma:1
    container_name: uptime_kuma
    restart: unless-stopped
    volumes:
      - kuma_data:/app/data
    networks:
      - tunnel_mesh
    security_opt:
      - no-new-privileges:true
    # Note: NO host ports exposed! Only accessible via internal Docker DNS.

  # =========================================================================
  # Demo Service 2: Whoami (HTTP Header & Diagnostic Tool)
  # =========================================================================
  whoami:
    image: traefik/whoami:v1.10
    container_name: debug_whoami
    restart: unless-stopped
    networks:
      - tunnel_mesh
    security_opt:
      - no-new-privileges:true

networks:
  tunnel_mesh:
    driver: bridge
    ipam:
      driver: default
      config:
        - subnet: 172.28.0.0/16

volumes:
  kuma_data:
    driver: local
Launch the stack in detached mode and verify that all containers start successfully:
docker compose up -d
docker compose ps
Check the container logs to ensure cloudflared has connected to the Cloudflare Anycast edge over QUIC:
docker compose logs -f cloudflaredYou should see confirmation messages indicating that four connections have been registered:
INF Registered tunnel connection connIndex=0 connection=... ip=... location=FRA protocol=quic
INF Registered tunnel connection connIndex=1 connection=... ip=... location=DUS protocol=quic
INF Registered tunnel connection connIndex=2 connection=... ip=... location=FRA protocol=quic
INF Registered tunnel connection connIndex=3 connection=... ip=... location=DUS protocol=quic
Step 4: Configure Public Hostnames and Routing in Cloudflare
Return to the Cloudflare Zero Trust Dashboard where you created the tunnel. Now we map public subdomains to our private internal Docker container addresses:
- Click the Public Hostname tab on your tunnel page.
- Click Add a public hostname.
- Configure the first service (Uptime Kuma):
- Subdomain:
status(oruptime) - Domain: Select your delegated domain from the dropdown (e.g.,
yourdomain.com). - Type:
HTTP - URL:
uptime-kuma:3001(Notice: we use the Docker service name and its internal listening port).
- Subdomain:
- Under Additional application settings > TLS:
- Enable No TLS Verify if routing to an upstream HTTPS service with a self-signed certificate. For plain HTTP services, leave standard settings.
- Enable HTTP2 Support for multiplexing.
- Click Save hostname. Cloudflare automatically injects a CNAME record in your Cloudflare DNS zone pointing
status.yourdomain.comto<tunnel-id>.cfargotunnel.com. - Repeat the process for the
whoamidiagnostic service:- Subdomain:
whoami - Domain:
yourdomain.com - Type:
HTTP - URL:
whoami:80
- Subdomain:
Test the route in your browser: navigate to https://whoami.yourdomain.com. You will instantly see your browser headers reflected back through Cloudflare’s edge with automatic TLS termination.
Step 5: Enforcing Cloudflare Zero Trust Access Policies
While the tunnel exposes your application without open router ports, the public URL is still accessible by anyone on the internet who discovers the hostname. To turn your setup into an enterprise-grade private enclave, place Cloudflare Access in front of administrative interfaces (like Uptime Kuma):
- In the Cloudflare Zero Trust Dashboard, go to Access > Applications.
- Click Add an application and select Self-hosted.
- Enter an Application name (e.g.,
Uptime Kuma Homelab) and session duration (e.g.,24 hours). - Specify the Application domain:
status.yourdomain.com. - Click Next to configure policy rules:
- Rule Name:
Admins Only - Action:
Allow - Configure criteria: Select
Include>Emailsand enter your administrative email address (e.g.,admin@yourdomain.com). Alternatively, choose Google OAuth, GitHub, or OIDC identity providers.
- Rule Name:
- Click Save application.
Now, when anyone visits https://status.yourdomain.com, Cloudflare intercepts the request at the edge with a branded one-time PIN (OTP) or SSO login prompt. Unauthenticated web crawlers, vulnerability scanners, and unauthorized actors cannot send a single byte of application traffic to your server.
Production Hardening & Best Practices
To run Cloudflare Tunnels reliably in mission-critical homelabs or edge environments, implement these operational hardening techniques:
- Force QUIC Protocol: By default,
cloudflaredwill negotiate QUIC (HTTP/3 over UDP). QUIC provides faster connection migration and lower latency across fluctuating broadband connections. Ensure your host firewall allows outbound UDP traffic on port 7844. - Container Security Sandbox: In our Compose definition, we enabled
security_opt: - no-new-privileges:trueand setread_only: true. This prevents privilege escalation inside the container even if the daemon binary were exploited. - Separate Docker Networks for Tunnel and Databases: Never place your database containers (such as MariaDB or PostgreSQL) on the
tunnel_meshnetwork. Maintain a privatebackend_netthat only application containers can access.cloudflaredshould strictly reach web listeners. - Enable Prometheus Metrics:
cloudflaredexposes internal tunnel metrics on port 2000. You can point Prometheus or VictoriaMetrics tohttp://cloudflared:2000/metricsto monitor tunnel connection latency, reconnect counts, and error rates.
Troubleshooting Common Cloudflare Tunnel Issues
Even with clean Compose files, real-world network edge cases can arise. Here are three common issues and their solutions:
1. Error 1033: Cloudflare Tunnel Error
Symptom: The browser displays Error 1033: Argo Tunnel error when trying to reach your subdomain.
Root Cause: The cloudflared daemon is offline, crashing on startup, or unable to authenticate with the Cloudflare edge.
Fix: Check container logs with docker compose logs cloudflared. Verify that your TUNNEL_TOKEN in .env does not contain extraneous quotation marks or spaces. Ensure the host can resolve DNS and establish outbound UDP port 7844 or TCP port 443 connections.
2. WebSocket Disconnects & Real-Time Streaming Timeouts
Symptom: Web applications relying on WebSockets (such as Home Assistant, Uptime Kuma live status, or Nextcloud Talk) continuously disconnect and reconnect.
Root Cause: WebSockets are disabled in the Cloudflare Zone configuration, or proxy timeouts truncate idle TCP sockets.
Fix: In the Cloudflare Dashboard, go to Network settings for your domain and ensure WebSockets is toggled to ON. In your Zero Trust Public Hostname configuration, adjust the HTTP Keep-Alive timeout to 90 seconds.
3. Bad Gateway (502) or Host Unreachable
Symptom: Cloudflare edge returns HTTP 502 Bad Gateway.
Root Cause: cloudflared cannot communicate with the target container over Docker’s internal network.
Fix: Ensure both cloudflared and the destination service share the exact same user-defined Docker network. In Cloudflare’s Public Hostname settings, specify the container name and internal port (e.g. uptime-kuma:3001), NOT localhost:3001 or the host IP.
Conclusion
Cloudflare Tunnels provides one of the most effective, elegant security upgrades available for modern self-hosters and DevOps engineers. By routing traffic through an outbound encrypted tunnel, you decouple your private infrastructure from public IP visibility, bypass Carrier-Grade NAT limitations, and gain enterprise-tier DDoS mitigation and Zero Trust access control—all with a clean, declarative Docker Compose architecture. With no open firewall ports and edge authentication guarding your services, you can deploy and manage homelab apps with absolute peace of mind.

Hi, I’m Mark, the author of Clever IT Solutions: Mastering Technology for Success. I am passionate about empowering individuals to navigate the ever-changing world of information technology. With years of experience in the industry, I have honed my skills and knowledge to share with you. At Clever IT Solutions, we are dedicated to teaching you how to tackle any IT challenge, helping you stay ahead in today’s digital world. From troubleshooting common issues to mastering complex technologies, I am here to guide you every step of the way. Join me on this journey as we unlock the secrets to IT success.