Docker has fundamentally changed how we deploy and manage applications. But if there’s one area where developers and DevOps engineers often stumble, it’s Docker networking. Understanding how containers communicate—with each other, with the host system, and with the outside world—is essential for building reliable, scalable containerized applications.
In this deep dive, we’ll explore everything from the built-in network drivers Docker provides out of the box to advanced multi-host networking scenarios. Whether you’re running your first container or orchestrating a complex microservices architecture, this guide has you covered.
How Docker Networking Works: The Basics
When Docker is installed, it creates a virtual networking layer on your host machine. By default, Docker sets up three networks automatically. Each network type serves a different purpose and determines how containers can communicate.
To see the networks Docker has created, run:
docker network lsYou’ll typically see something like this:
- bridge — the default network for containers
- host — removes network isolation between container and host
- none — disables all networking for a container
- overlay — connects containers across multiple Docker hosts
The Four Core Network Drivers
1. Bridge Network
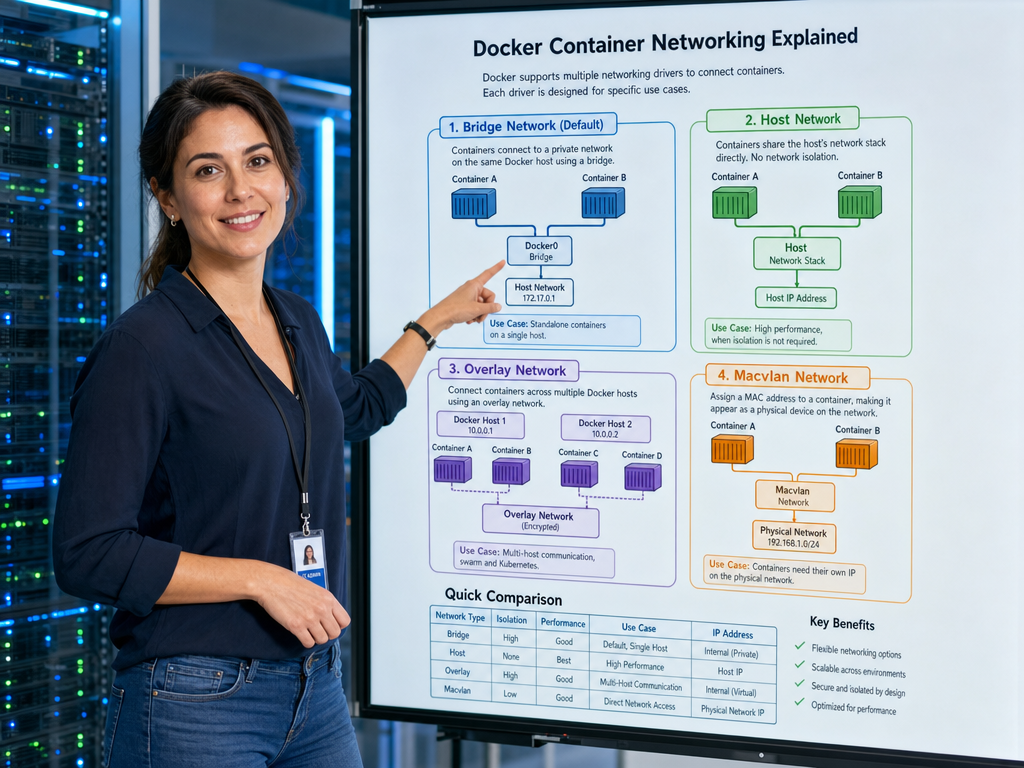
The bridge network is Docker’s default networking model. When you start a container without specifying a network, it connects to the bridge network. This creates a private internal network on your host, with Docker’s virtual bridge acting as the central hub.
Containers on the same bridge network can communicate with each other using their container names as hostnames. Containers not connected to the same network are isolated from each other.
To create a custom bridge network:
docker network create --driver bridge my_custom_networkTo connect a container to this network:
docker run -d --name web --network my_custom_network nginx2. Host Network
When you use the host network driver, the container shares the host’s network namespace directly. This means the container’s network stack is not isolated from the Docker host. The container has access to the host’s network interfaces directly.
Use host networking when you need maximum network performance or when you’re running services that need to bind to specific network ports on the host without any translation.
docker run -d --name web --network host nginxBe careful: when using host networking, you can’t map container ports to the host (like -p 8080:80) because the container shares the host’s ports directly.
3. Overlay Network
The overlay network driver creates a distributed network across multiple Docker hosts. This is the key to container orchestration in Docker Swarm or Kubernetes environments, where containers running on different hosts need to communicate seamlessly.
Overlay networks handle the complexity of VXLAN tunneling, allowing containers to communicate as if they were on the same physical network, regardless of which host they’re running on.
docker network create --driver overlay my_overlay_network4. Macvlan Network
The macvlan driver allows a container to appear as a physically connected device on your network. Each container gets its own MAC address and IP address directly from your physical network. This is useful for legacy applications that need direct network access or for performance-critical workloads.
docker network create --driver macvlan \
  --subnet=192.168.1.0/24 \
  --gateway=192.168.1.1 \
  -o parent=eth0 my_macvlan_network
Connecting Containers: Practical Examples
Container-to-Container Communication
Containers on the same custom bridge network can communicate using DNS-based service discovery. Docker’s embedded DNS server resolves container names to their IP addresses automatically.
# Create a network
docker network create my_app_network

# Start a backend service
docker run -d --name backend --network my_app_network my_backend_image

# Start a frontend service
docker run -d --name frontend --network my_app_network my_frontend_image

# Now 'frontend' can reach 'backend' by hostname
docker exec frontend curl http://backend:8080/api
Exposing Ports to the Host
To make a container’s service accessible from outside the Docker host, you need to publish its ports. This maps a host port to a container port.
docker run -d -p 8080:80 --name web nginxThis maps port 8080 on the host to port 80 inside the container. You can now access the web server at http://localhost:8080.
You can also specify which IP address to bind to:
docker run -d -p 127.0.0.1:8080:80 nginx  # only accessible locally
docker run -d -p 0.0.0.0:8080:80 nginx      # accessible from any interface
Connecting to an Existing Network
You can connect a running container to additional networks:
docker network connect my_second_network webOr disconnect a container from a network:
docker network disconnect my_second_network webInspecting Networks and Troubleshooting
When something isn’t working, Docker provides excellent debugging tools. Start with inspecting the network configuration:
docker network inspect bridgeThis shows all containers connected to the bridge, along with their IP addresses and the network’s settings.
To check which networks a specific container is connected to:
docker inspect --format='{{range $key, $value := .NetworkSettings.Networks}}{{$key}} {{end}}' webFor connectivity issues, you can run a test container with diagnostic tools:
docker run --rm --network my_app_network nicolaka/netshoot curl -v http://backend:8080User-Defined Bridge Networks vs. Default Bridge
There are important differences between the default bridge network and user-defined bridge networks:
| Feature | Default Bridge | User-Defined Bridge |
|---|---|---|
| DNS resolution by container name | Only with --link (deprecated) |
Automatic |
| Container isolation | Less granular | Better isolation |
| Dynamic network configuration | Requires restart | Connect/disconnect at runtime |
| Configuration | Difficult to modify | Easily customizable |
Best practice: prefer user-defined bridge networks for most use cases. They offer better isolation, automatic DNS resolution, and more flexibility.
Advanced: Docker Compose Networking
When using Docker Compose, networks are managed automatically. By default, Compose creates a network for your application stack, and all services can communicate using their service names.
version: '3.8'
services:
  web:
    image: nginx
    ports:
      - "8080:80"
  api:
    image: my_api
    depends_on:
      - database
  database:
    image: postgres
networks:
  default:
    driver: bridge
In this example, the web and api services can reach the database service at the hostname database, and api can reach database the same way.
Multi-Host Networking with Overlay
For production environments running multiple Docker hosts, overlay networks enable seamless container-to-container communication across hosts. This requires either Docker Swarm mode or an external key-value store like etcd.
# Initialize Docker Swarm (creates the default overlay network)
docker swarm init

# Create a custom overlay network
docker network create --driver overlay my_production_network

# Now containers on different hosts can communicate
docker service create --name api --network my_production_network my_api_image
Security Best Practices
- Use user-defined networks instead of the default bridge for better isolation
- Limit exposed ports — only expose what you need
- Use network segmentation to isolate sensitive services
- Avoid host networking unless performance is critical
- Use TLS encryption for overlay networks in production
Key Takeaways
Docker networking doesn’t have to be mysterious. The key concepts to remember:
- Bridge networks are great for single-host container communication
- Overlay networks are the solution for multi-host scenarios
- Macvlan bridges the gap between containers and physical networks
- User-defined networks always beat the default bridge for production use
- Docker’s embedded DNS makes service discovery automatic in user-defined networks
Understanding these networking fundamentals will save you hours of debugging and help you build more resilient, production-ready containerized applications.

Hi, I’m Mark, the author of Clever IT Solutions: Mastering Technology for Success. I am passionate about empowering individuals to navigate the ever-changing world of information technology. With years of experience in the industry, I have honed my skills and knowledge to share with you. At Clever IT Solutions, we are dedicated to teaching you how to tackle any IT challenge, helping you stay ahead in today’s digital world. From troubleshooting common issues to mastering complex technologies, I am here to guide you every step of the way. Join me on this journey as we unlock the secrets to IT success.